How to install and use VOSySmonitor on a Raspberry Pi 4B Board
A guide to implement multiple OS's on Raspberry Pi 4B
The VOSySmonitor solution by VOSyS has been customized to run on the Raspberry Pi 4 Model B board, thus allowing on it a concurrent execution of a safety-critical Real Time OS and non-critical General Purpose OS. Although this guide is meant for this ARM architecture platform, VOSySmonitor mixed-criticality solution is portable also on the x86 (VOSySmonitorX86) and RISC-V (VOSySmonitoRV) architectures.
The Raspberry Pi platform complies to the requirements needed for VOSySmonitor installation, in particular related to the ARM security hardware extensions and provision for different Security Exception Levels; also, the this platform features a Generic Interrupt Controller that gives the ability to configure each interrupt as either Secure or Non-secure; last, its CPU powerfulness fits the execution of multiple operating systems.
Attention!
This SoC lacks a secure memory controller: as a consequence of that, the installation of VOSySmonitor to the Raspberry Pi 4 board comes with no actual guarantee that the RTOS and GPOS worlds are isolated. This is because in this SoC there is no support for DRAM isolation between the Secure and the Non-Secure worlds.
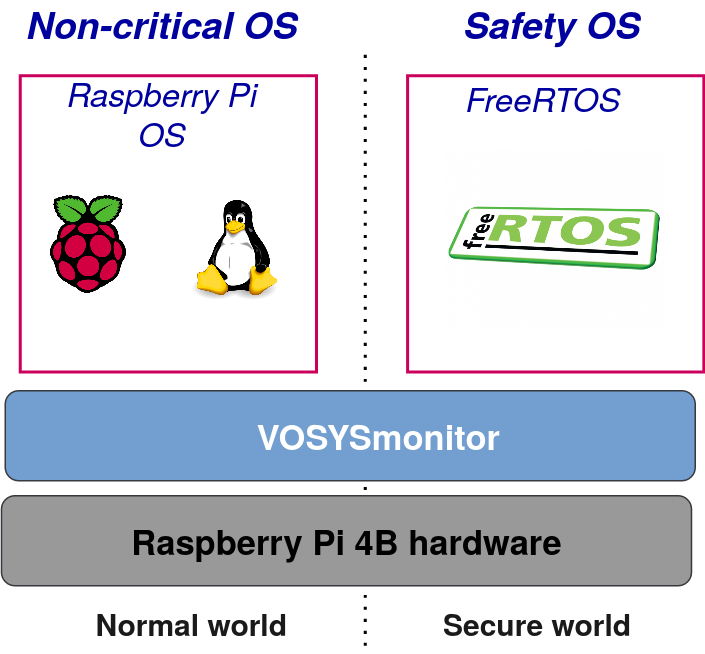
This guide will go-through all the steps needed to have VOSySmonitor installed on the Raspberry Pi 4 board and coordinate the execution of a FreeRTOS and a Raspberry Pi 32-bit General Purpose OS.

Figure 1 - Architecture overview
All the commands and the VM in this guide can be run from command line through a terminal or serial/SSH connection.
1. VOSySmonitor binary generation
In the Raspberry Pi 4B board, VOSySmonitor and FreeRTOS are loaded as a single executable binary from the RPI firmware. The final VOSySmonitor binary can be generated after extending and compiling FreeRTOS with any application of choice. Thus, the first step towards the VOSySmonitor binary generation is to compile FreeRTOS from source. After FreeRTOS is compiled, the final VOSySmonitor binary can be generated.
FreeRTOS compilation
The prerequisites for FreeRTOS compilation are:
- Access to FreeRTOS source code
- Installed cross-compiler aarch64_none_elf
Then, FreeRTOS compilation step will result to a FreeRTOS.bin generation and can be done as follows:
# Clone FreeRTOS code
$ git clone git@git.virtualopensystems.com:enoch/freertos.git
$ cd freertos

# Build Application of choice
$ make PLAT=rpi4 ARCH=a64 APP={APP NAME} CROSS_COMPILE=/path/to/aarch64-none-elf-
VOSySmonitor binary compilation
Given that FreeRTOS.bin is produced, the final step towards vosysmonitor.bin generation requires:
- FreeRTOS.bin
- vosysmonitor.axf object file, which is based on VOSySmonitor code solely
- Installed cross-compiler aarch64-linux-gnu-objcopy
Then, vosysmonitor.bin generation can be done in two steps as follows:
# Command to place FreeRTOS.bin under correct section
$ aarch64-linux-gnu-objcopy \
   --update-section "SecWorld_EntryPoint"=/path/to/FreeRTOS.bin \
   vosysmonitor.axf vosysmonitor-rtos.axf

# Command to produce the final vosysmonitor binary
$ aarch64-linux-gnu-objcopy -O binary vosysmonitor-rtos.axf vosysmonitor.bin
VOSySmonitor binary with FreeRTOS included is now ready, so we can proceed to the next section.
2. VOSySmonitor installation for 32-bit Raspberry Pi OS GPOS
Every Linux distribution comes with configuration files that are used to setup previous-to-Linux bootloaders. We take advantage of such functionality to introduce VOSySmonitor as a binary to run at the initial boot stages. These configuration instructions are distribution-specific, since they depend on the configuration files each distribution exports.
For a Raspberry Pi OS 32-bit setup, two main steps are needed to have VOSySmonitor booted in the board. The first step concerns some bootup configuration arguments that need to be integrated. Second step concerns some Device Tree customizations. These steps are explained on next sections.
Login or register to access full information

 VOSySofficial


